notebooks/pipcook_object_detection.ipynb (309 lines of code) (raw):
{
"nbformat": 4,
"nbformat_minor": 2,
"metadata": {
"colab": {
"name": "pipcook_object_detection.ipynb",
"provenance": [],
"collapsed_sections": []
},
"kernelspec": {
"name": "python3",
"display_name": "Python 3"
},
"accelerator": "GPU"
},
"cells": [
{
"cell_type": "markdown",
"source": [
"## Environment Initialization\n",
"This cell is used to initlialize necessary environments for pipcook to run, including Node.js 12.x."
],
"metadata": {
"id": "Ct2dCXvqrGHj"
}
},
{
"cell_type": "code",
"execution_count": null,
"source": [
"!wget -P /tmp https://nodejs.org/dist/v12.19.0/node-v12.19.0-linux-x64.tar.xz\n",
"!rm -rf /usr/local/lib/nodejs\n",
"!mkdir -p /usr/local/lib/nodejs\n",
"!tar -xJf /tmp/node-v12.19.0-linux-x64.tar.xz -C /usr/local/lib/nodejs\n",
"!sh -c 'echo \"export PATH=/usr/local/lib/nodejs/node-v12.19.0-linux-x64/bin:\\$PATH\" >> /etc/profile'\n",
"!rm -f /usr/bin/node\n",
"!rm -f /usr/bin/npm\n",
"!ln -s /usr/local/lib/nodejs/node-v12.19.0-linux-x64/bin/node /usr/bin/node\n",
"!ln -s /usr/local/lib/nodejs/node-v12.19.0-linux-x64/bin/npm /usr/bin/npm\n",
"!npm config delete registry\n",
"\n",
"import os\n",
"PATH_ENV = os.environ['PATH']\n",
"%env PATH=/usr/local/lib/nodejs/node-v12.19.0-linux-x64/bin:${PATH_ENV}"
],
"outputs": [],
"metadata": {
"id": "6v8pGPuXrI3H"
}
},
{
"cell_type": "markdown",
"source": [
"## install pipcook cli tool\n",
"pipcook-cli is the cli tool for pipcook for any operations later, including installing pipcook, run pipcook jobs and checking logs."
],
"metadata": {
"id": "c6kRSyP0rMTh"
}
},
{
"cell_type": "code",
"execution_count": null,
"source": [
"!npm install @pipcook/cli -g --unsafe-perm\n",
"!rm -f /usr/bin/pipcook\n",
"!ln -s /usr/local/lib/nodejs/node-v12.19.0-linux-x64/bin/pipcook /usr/bin/pipcook"
],
"outputs": [],
"metadata": {
"id": "gb_4-lTYrQGf"
}
},
{
"cell_type": "markdown",
"source": [
"## Check Pipcook Version\n",
"Just to check if PipCook is installed correctly"
],
"metadata": {
"id": "d6c3uYd1rUVW"
}
},
{
"cell_type": "code",
"execution_count": null,
"source": [
"!sudo pipcook -v"
],
"outputs": [],
"metadata": {
"id": "T7wz5S54rb4T"
}
},
{
"cell_type": "markdown",
"source": [
"# Detect the UI components from a design draft\n",
"\n",
"## Background\n",
"\n",
"Have you ever encountered such a scenario in the front-end business: there are some pictures in your hand, and you want an automatic way to identify which components are included in this picture, where these components are located in the picture, and which type components are of. This kind of task are generally called object detection in the field of deep learning.\n",
"\n",
"> Object detection refers to finding targets from a scene (picture), including two processes: where and what.\n",
"\n",
"This kind of detection is very useful. For example, in the research of code generation from image, the front-end code is mainly composed of div, img and span. We can identify the shape, bitmap, and text position in the image, and then directly generate the corresponding codes.\n",
"\n",
"This tutorial will teach you how to train a model to do such a detection task.\n",
"\n",
"## Scenario\n",
"\n",
"For example, as shown in the following, this picture contains multiple components, including buttons, switches, input boxes, etc., we want to identify their location and type:\n",
"\n",
"\n",
"\n",
"For the trained model, after inputting this picture, the model will output the following prediction results:\n",
"```js\n",
"{\n",
" boxes: [\n",
" [83, 31, 146, 71], // xmin, ymin, xmax, ymax\n",
" [210, 48, 256, 78],\n",
" [403, 30, 653, 72],\n",
" [717, 41, 966, 83]\n",
" ],\n",
" classes: [\n",
" 0, 1, 2, 2 // class index\n",
" ],\n",
" scores: [\n",
" 0.95, 0.93, 0.96, 0.99 // scores\n",
" ]\n",
"}\n",
"```\n",
"\n",
"At the same time, we will generate a `labelmap` during training. Labelmap is a mapping relationship between the serial number and the actual type. This generation is mainly due to the fact that our classification name is text, but before entering the model, we need to convert the text into numbers. Here is a labelmap:\n",
"\n",
"```json\n",
"{\n",
" \"button\": 0,\n",
" \"switch\": 1,\n",
" \"input\": 2\n",
"}\n",
"```\n",
"\n",
"Let’s explain the above prediction results:\n",
"\n",
"- boxes:This field describes the position of each component identified, displayed in the order of the upper left and lower right corners, such as [83, 31, 146, 71], indicating that the coordinates of the upper left corner of this component are (83, 13), lower right corner are (146, 71)\n",
"- classes: This field describes the category of each component. Combined with labelmap, we can see that the identified components are buttons, switches, input boxes and input boxes.\n",
"- scores: The confidence of each identified component. The confidence is how much information the model has for the results it has identified. Generally, we will set a threshold. We only take the results with confidence greater than this threshold.\n",
"\n",
"## Data Preparation\n",
"\n",
"When we want to do such a task of object detection, we need to make, collect and store our dataset according to certain specifications. There are two main types of datasets for object detection in the industry today, which are [Coco Dataset] (https ://cocodataset.org/) and [Pascal Voc](http://host.robots.ox.ac.uk/pascal/VOC/) datasets. We take Coco format as an example, the file directory is:\n",
"\n",
"- train\n",
" - annoation.json\n",
" - 1.jpg\n",
" - 2.jpg\n",
" - ...\n",
"- validation\n",
" - annoation.json\n",
" - 1.jpg\n",
" - 2.jpg\n",
" - ...\n",
"- test\n",
" - annoation.json\n",
" - 1.jpg\n",
" - 2.jpg\n",
" - ...\n",
"\n",
"We need to divide our dataset into a training set (train), a validation set (validation) and a test set (test) according to a certain proportion. Among them, the training set is mainly used to train the model, and the validation set and the test set are used to evaluate the model. The validation set is mainly used to evaluate the model during the training process to facilitate viewing of the model's overfitting and convergence. The test set is used to perform an overall evaluation of the model after all training is completed.\n",
"\n",
"For each dataset, Coco data format specifies a json annotation file to record which components and the location of each component in this picture. A typical XML file content is:\n",
"\n",
"```json\n",
"{\n",
" \"info\": info,\n",
" \"images\": [image],\n",
" \"annotations\": [annotation],\n",
" \"licenses\": [license],\n",
"}\n",
" \n",
"info{\n",
" \"year\": int,\n",
" \"version\": str,\n",
" \"description\": str,\n",
" \"contributor\": str,\n",
" \"url\": str,\n",
" \"date_created\": datetime,\n",
"}\n",
" \n",
"image{\n",
" \"id\": int,\n",
" \"width\": int,\n",
" \"height\": int,\n",
" \"file_name\": str,\n",
" \"license\": int,\n",
" \"flickr_url\": str,\n",
" \"coco_url\": str,\n",
" \"date_captured\": datetime,\n",
"}\n",
" \n",
"license{\n",
" \"id\": int,\n",
" \"name\": str,\n",
" \"url\": str,\n",
"}\n",
"```\n",
"\n",
"We have prepared such a dataset, you can download it and check it out: [Download](https://ai-sample.oss-cn-hangzhou.aliyuncs.com/pipcook/datasets/component-recognition-detection/object-detection-yolo.zip).\n",
"\n",
"## Start Training\n",
"\n",
"After the dataset is ready, we can start training. Using Pipcook can be very convenient for object detection training. You only need to build the pipeline like this:\n",
"\n",
"```json\n",
"{\n",
" \"specVersion\": \"2.0\",\n",
" \"datasource\": \"https://cdn.jsdelivr.net/gh/imgcook/pipcook-script@fe00a8e/scripts/tfjs-yolo/build/datasource.js?url=https://ai-sample.oss-cn-hangzhou.aliyuncs.com/pipcook/datasets/component-recognition-detection/object-detection-yolo.zip\",\n",
" \"dataflow\": [\n",
" \"https://cdn.jsdelivr.net/gh/imgcook/pipcook-script@9d210de/scripts/tfjs-yolo/build/dataflow.js?size=416&size=416\"\n",
" ],\n",
" \"model\": \"https://cdn.jsdelivr.net/gh/imgcook/pipcook-script@9d210de/scripts/tfjs-yolo/build/model.js\",\n",
" \"artifact\": [{\n",
" }],\n",
" \"options\": {\n",
" \"framework\": \"tfjs@3.8\",\n",
" \"train\": {\n",
" \"epochs\": 20,\n",
" \"validationRequired\": true\n",
" }\n",
" }\n",
"}\n",
"\n",
"```\n",
"\n",
"Since the object detection model, especially the model of the rcnn family is very large, it needs to be trained on a machine prepared with nvidia GPU and cuda 10.1 environment:"
],
"metadata": {
"id": "TID1Z5wHsMRZ"
}
},
{
"cell_type": "code",
"execution_count": null,
"source": [
"!sudo pipcook train https://raw.githubusercontent.com/alibaba/pipcook/main/example/pipelines/object-detection-yolo.json -o my-pipcook"
],
"outputs": [],
"metadata": {
"id": "WHUlvEqlsO9f"
}
},
{
"cell_type": "markdown",
"source": [
"Once the training is complete, we can predict. You can just have a try on code below to predict the image we provide. You can replace the image url with your own url to try on your own dataset. The predict result is in form of probablity of each category as we have explained before."
],
"metadata": {}
},
{
"cell_type": "code",
"execution_count": null,
"source": [
"!sudo pipcook predict ./my-pipcook -s ./my-pipcook/data/images/maksssksksss0.png"
],
"outputs": [],
"metadata": {}
},
{
"cell_type": "markdown",
"source": [
"\n",
"## Make your own dataset\n",
"\n",
"After reading the above description, are you already ready to use object detection to solve your own problems? If you want to make your own dataset, there are mainly the following steps.\n",
"\n",
"### Collect images\n",
"\n",
"This step is easier to understand. To have your own training data, you need to find a way to collect enough training pictures. In this step, you don’t need to label your own pictures. You only need to mark the original pictures.\n",
"\n",
"### Labelling\n",
"\n",
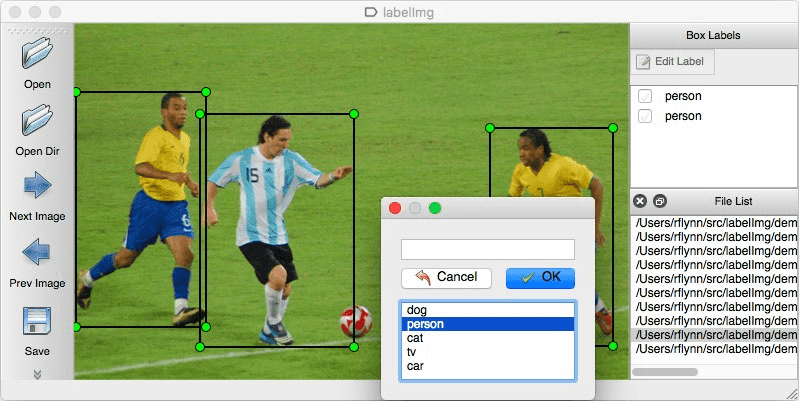
"There are many labeling tools now, you can use these labeling tools to mark which components are on your original picture, what the locations are and what types are of each component, Let's take [labelimg](https://github.com/tzutalin/labelImg) as example:\n",
"\n",
"\n",
"\n",
"You can install the software from the official labelimg website above, and then follow the steps below:\n",
"\n",
"- Build and launch using the instructions above.\n",
"- Click 'Change default saved annotation folder' in Menu/File.\n",
"- Click 'Open Dir'.\n",
"- Click 'Create RectBox'.\n",
"- Click and release left mouse to select a region to annotate the rect box.\n",
"- You can use right mouse to drag the rect box to copy or move it.\n",
"\n",
"### Training\n",
"\n",
"After making the above dataset, organize the file structure according to the introduction in the previous chapter. After that, you can start the pipeline for training.\n",
"\n",
"## Conclusion\n",
"\n",
"Readers have learned how to identify multiple front-end components in a image, which can be applied to some more general scenarios. So in an article, we will introduce a more interesting example, how to use Pipcook to achieve the transfer of picture style, such as replacing the oranges in the picture with apples, or replacing the realistic photo style with oil painting style."
],
"metadata": {
"id": "RaitqeZKEE1F"
}
}
]
}